
More joy for the carburetor
A previous article discussed the need to adapt the carburetor or fuel injection if the exhaust or air filter were changed, or if any other change was made that affected the engine's volumetric efficiency (the amount of air entering and exiting).
The CV carburetor
Well, I'm going to explain how to perform this adjustment on the Keihin CV carburetor, the one that comes standard on all HDs (and many other bikes) from 1989 to 2006. This is a "constant vacuum" carburetor, which works very well on street bikes, but is one of the first parts that many owners throw in the trash when they want to improve the bike's performance by replacing it with a larger carburetor, such as S&S, Mikuni, Rivera, etc. Regarding this, I will say that on an engine up to 88ci (1450cc), for "street" use, a larger carburetor is not always going to be better. The reason is that if the carburetor is too large, we will lose response at low and medium RPM, where the engine is most used. If we're not going to race and our cylinder heads and camshafts aren't very aggressive, the Keihin CV's nearly 40mm of venturi are enough to make our V-Twin happy, of course, after having prepared it a little.
Aside from the increased airflow after replacing the exhaust or filter, we must also consider that these carburetors do not come optimally configured due to the requirement for compliance with emissions regulations (therefore, it is the owner's responsibility to modify the vehicle for use on public roads). The carburetors come with extremely lean mixtures and sealed adjustment screws, and even the air filter doubles as a noise suppressor. Therefore, it is highly recommended to replace it with a high-performance filter element, such as K&N or similar.
Let's get to work
Let's turn our boring carburetor into a more lively item by installing a Dynojet kit .
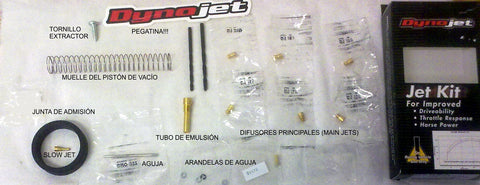
I chose this kit because it's specifically tailored to each year and model of bike, but I could have also installed any similar kit from other manufacturers (Yost, Screamin' Eagle, Cycle Pro, Slinger, etc.). The kit comes with two drills, an adjustable needle, various sized jets, a tube of emulsion, and even a sticker that, while it won't make the bike go faster, looks really cool on the lid of our toolbox. In the photo, I also added a low-speed jet and a new intake gasket for the carburetor.
The first thing we need to do is remove the motorcycle's carburetor, following the instructions in the service manual. Next, we drill through the sealed plug to access the idle mixture adjustment screw.
Be very careful, as you could permanently damage the screw underneath. Just make a small hole in the plug, then insert the extraction screw and pull it out with pliers (discard the plug and extraction screw). Next, gently screw in the adjustment screw until it seats and back it out 3 turns. This will allow you to start the bike to adjust the carburetor.
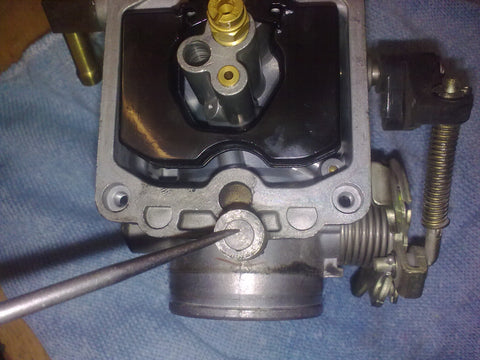
We proceed to unscrew the main diffuser and the emulsion tube, and replace them with the ones included in the kit. We choose the diffuser number recommended in the manufacturer's instructions, depending on whether the motorcycle is completely original, with a high-performance filter or exhaust, or with a high-performance camshaft.

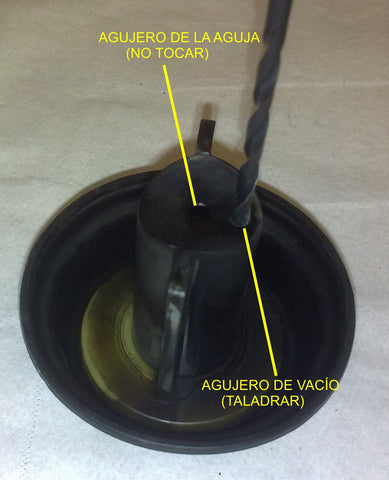
In the image above, we can see this screw and the replaced diffusers. We reinstall the tank cover and remove the carburetor's top cover, removing the spring and vacuum piston. Using the #29 drill bit supplied in the kit, we proceed to enlarge the piston bore (not to be confused with the needle's center hole). This operation, along with replacing it with a lighter spring, will achieve a faster carburetor response.
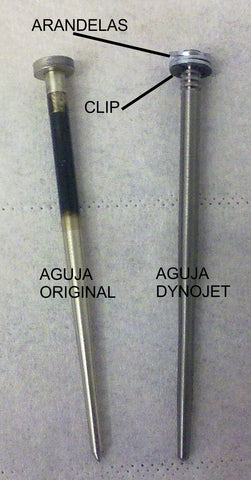
We reassemble everything, making sure to replace the spring and needle with the new parts. We'll place a clip on the needle following the manufacturer's instructions, and place three washers on top of it.
When closing the lid, be careful to ensure the gasket fits properly. Tip: Before tightening the screws, hold the lid with your fingers and move the piston up and down to see if the vacuum slows it down slightly.
Let's get going...
Once the carburetor and filter are installed, we start the engine and let it reach operating temperature. We adjust the idle speed (not too low) and slowly screw in the mixture adjustment screw until the engine begins to misfire. We note this position and slowly back it out until the engine begins to misfire again, and then note the new position. The ideal mixture screw setting is exactly halfway between these two positions. Tip: If this position requires backing out the mixture screw more than 3.5 turns from its fully closed position, you may have a diffuser (slow-speed jet) that's too small for your engine. For Sportsters and Evolutions, I recommend a #45, and for TwinCam 88s, I recommend a #48. We readjust the idle speed and that's it.
If you've followed the instructions correctly, you'll be rolling with the wind right now, with a more powerful engine and better acceleration. Enjoy!
Frank Burguera
11 comments
bonjour merci pour les infos je vais surement reprendre un 883 de 2002 a carbu et surement faire cette inversion a bientot cordialement
Hola buenas noches quisiera saber si ustedes me pueden colaborar en la siguiente información para Harley 883 modelo 96bel chicler de mínima y altas 1 número eso q chicleras debe tener muchas gracias quedó atento
Se puede hacer este procedimiento de perforación pistón de vacio a mis carburadores Keihin 24 de moto honda Rebel 450 ??
Se puede hacer este procedimiento de perforación pistón de vacio a mis carburadores Keihin 24 de moto honda Rebel 450 ??
Que tamaña de broca es para hacerle el agujero al pistón
J’ai un Kit “Dynojet” depuis 20 ans ! Fat-Boy 1993’ Terminator.
Non,c’est pas possible les gicleurs +170 et +45 ou 48… trop riche ! le pont d’échappement peté toujours.
J’ai 40 ou 42 et 165 ça-suffit et fonctionne très-bien !!! les bougies "Bosch Platnium
WR7DP ou WR8DP & la bobine 45.000 volts mieux que d’origine !
Hola buenos días.
Quiero un kit Dynoyet ( Carburador Keihin 27490-04) Modelo moto: harley Sportster 883 XL C.
Podrian decirme Que modelo kit comprar, Y que surtidor de Altas y Bajas poner. Gracias
Hola ,tengo una sportster,1200/05
Desarme para limpiar el çarbura,pero no recuerdo si en la aguja llevaba una arandela ,quisiera saber si me puedes decir si la lleva o no o si ay algún diagrama donde pueda encontrar información más detallada ,te lo agradecería ,
Hola buenas tardes!! Soy un motociclista de corazón e autodidacta. Al darle lectura a tu artículo, el cual me parece muy bien, me percaté que solo recomiendas una esprea; la cual es la #45. Podrías decirme para la alta, que #? recomiendas. Gracias.
Muy buen tutorial,para agregarle más potencia al motor,con solo hacer unos pequeños ajustes al carburador,Gracias