Tutorial: repair and replacement of Harley-David clutch discs
A little theory
The clutch of a vehicle is the component that joins the engine with the transmission, allowing to connect or disconnect the force (torque) from the engine to the transmission, in order to change from march, for example.
It has one or more friction discs, pressured by docks (or a diaphragm) that are released when we press the handle, then leaving the engine without connection with the transmission, which is known as the engine unexpected.

In most motorcycles, the clutch has several friction discs (connected to the engine), interspersed with metal discs (connected to the transmission), all bathed in oil. Friction discs are usually covered with Aramida, Kevlar, Carbon ... with the aim of not slipping on the metal discs when they are pressured by the docks (clutch engine).

This material wears out over time and can deteriorate due to excess heat, losing its effectiveness and allowing sliding discs to between them still under the force of the dock, a situation in which we say that the clutch skates.
Diagnosis
We find a motorcycle that when we accelerate rises of revolutions, but the speed of the vehicle does not rise in consonance or, in extreme cases, we engage the first speed and when the clutch lever is released the motorcycle does not advance. In both situations we are likely to have a worn or broken clutch.
Trick: If we suspect a clutch that begins to skate, we can put the motorcycle against a wall and, after putting first speed, accelerate slightly against the wall. RPM should not climb too much, if they do the clutch is skating.
Clutch disc change
In this tutorial, we will replace the clutch discs of a Harley-Davidson Sportster. The first thing we will do will be to drain the oil of the primary crankcase (in this model it contains both primary and transmission oil)

and loosen the tensioner of the primary chain.

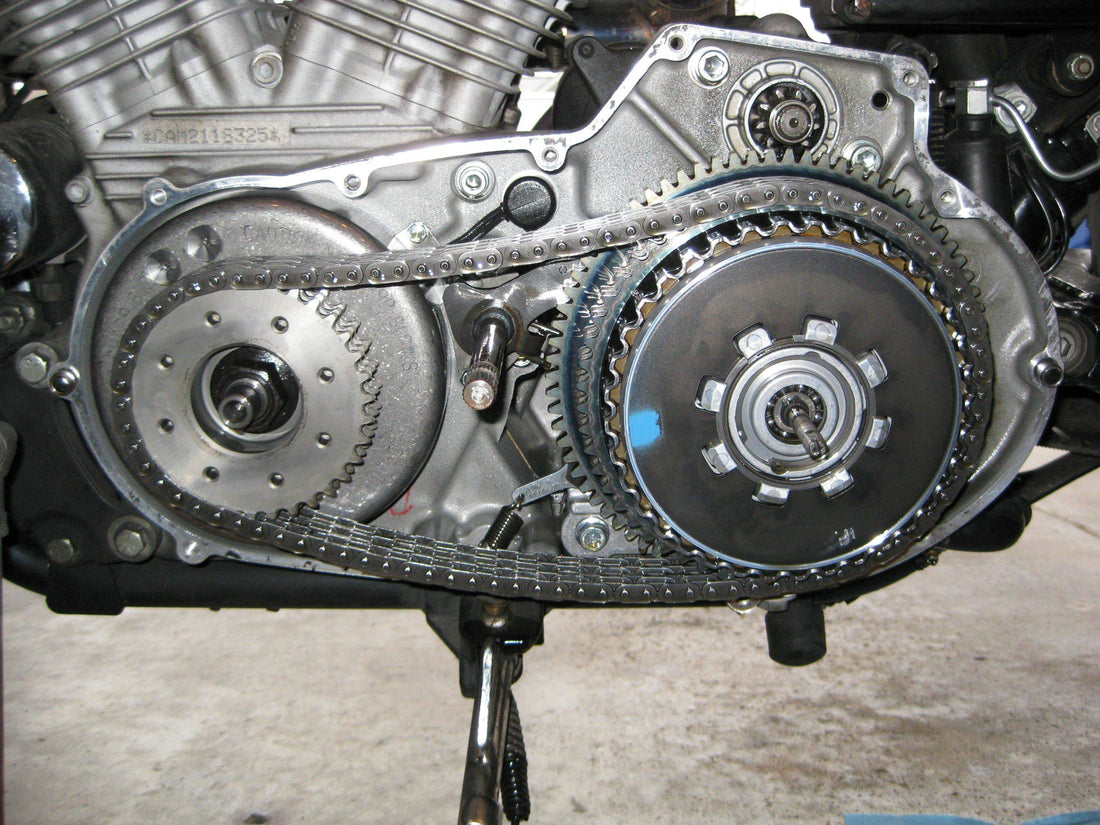
After releasing the resting support and the gear lever, with the help of a Torx 27 key, we loosen the clutch cover screws, which will allow us to access the ramp mechanism. With a flat screwdriver we loosen this mechanism until the ramp releases, which we can extract.

We continue to release all the screws that hold the primary chain lid and then we can separate it from the crankcase.

The next step requires the use of a clutch spring compressor, a specific user for the year and model of the vehicle in which we are going to work, and that will allow us to compress the diaphragm (spring) to be able to release the circlip that holds it.

With the help of a couple of fine screwdrivers or hooks, we are extracting clutch discs one by one while we check and clean everything.

Improving the original
A peculiarity of some Sportster models is that they have 8 friction dishes and 6 steel discs, and located in the middle, a double riveted disk that serves to soften the operation. This album is usually broken very easily, destroying the other clutch components.

To prevent this problem and increase clutch efficiency at the same time, we will install an “extra plate” kit from the American manufacturer Barnett, which eliminates this dock disc and replaces it by two more albums, increasing the friction surface by 12%, improving both the grip and the duration of the components.

Similarly, we will replace the small unreasonable bearing, which is the one that supports all the pressure when the engine is unleashed. It is a very economical component that should be replaced with each change of discs.
Mounting
After having the friction discs a couple of hours submerged in oil, we start installing one of these, followed by a metallic disk. We install another friction discs, one metallic ... and we are interspersing them in this way until they are all in place.


We return the pressure plate and its circlip, and we can already release the spring compression tool. At this time we take the opportunity to extract the disruption mechanism

And change the bearing for a new one, we will help a bearing installer and a bank press or screw.

We can already put a new joint and put the clutch cover back, careful not to damage the axis of the gearshift lever axis. This checkpoint is advisable to put it new, so we will use a full primary school kit when we perform this type of operations.

We screw the lid in the order and to the tightening torque indicated in the service manual of the year and model of the motorcycle with which we are working (remember to consult the manual, it is the most important tool). After compressing the clutch cable tensioner, we install the ramp mechanism again and set the clutch cover instead.
In this step we can already fill with oil, the Sportster model uses 1 quart (946ml) of specific oil for primary and transmission.

Next, we tense the primary chain again and install the inspection cover by pressing the screws to its corresponding pair (all these procedures are detailed in the manual corresponding to each model).

We just have to adjust the clutch cable tensioner, for this we will extend the adjuster until the cable has an approximate clearance of 3mm.

This slack is necessary to allow the expansion of the clutch components when expanding by heat, if we do not leave the clutch discs they will burn prematurely.

Filming
After the assembly we have to perform a test return, verifying the proper functioning of the clutch and the absence of oil leaks. It is advisable to make a small “filming” of the clutch, without abrupt accelerations or decelerations in the first kilometers, so that the components settle correctly, thus prolonging their useful life.
Frank Burguera
#mecanicaharley
3 comments
Sehr gut beschrieben,klar und verständlich, Dankeschön
La presse pour enlever le circlips du couvercle ?
Le roulement est il prévu dans le kit ainsi que les joints ?
Cordialement
Je xui mécanicien ,tout ses informations von me permets de changer pou la première foi les disque d une Harley Davidson